Mini Gift Box |
At a stamping meeting, a fellow demonstrator showed us this totally cute and easy little stampable box! There is no measuring and it is so simple. I'll see if I can explain it properly:
You will need two pieces of card stock (any size will work for this, but postcard size works great for a ring-size box) one piece for the lid of the box, one for the bottom. You can use matte finish, glossy, colored card stock, cereal boxes, whatever.
On the BACKside of each piece of card stock, you will need to find the center. So, you take a straightedge and with a pencil make a light line from one top corner to the opposite bottom corner. Do this again with the other corners to form an "X". Where the "X" crosses is the center of your card!
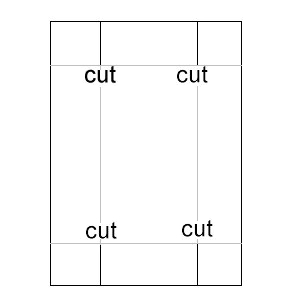
Take one piece of card stock and stamp or roller wheel on the front side of it (the side without the "X"). This will be your lid. Now, turn it back over and fold each of the sides into the center, crease and fold back. You can erase the "X" now on that card. Okay, now you need to make some simple cuts. You will be making 4 short cuts along the folds of the long sides. Make these cuts from the edge of the paper up to the next fold line you encounter. I think the best way to show you where is to make a diagram, so here goes:
Now you are ready to assemble your box top. Fold up each of the long sides of your box. The little end flaps will fold to the inside of your box. Then take one of the short sides of the box, put glue or double stick tape or monoadhesive on the edge of it and fold it up and over those little flaps. Do this to the other side.
For the bottom of the box you will do essentially the same except that in order to make the lid fit over the bottom, you must make each of your folds on this piece of card stock go slightly *past* the center mark by just a tad--maybe by 1/16 of an inch. The cuts and assembly are the same.
A FEW NOTES:
-It is not necessary to decorate the outside of the bottom of the box because it will not show.
-If you want to be cute, you can stamp the inside of the bottom of the box before or after assembling it. One suggestion was using a roller wheel for the lid and using a matching small stamp inside.
-Show how cute the box can be by wrapping a pretty ribbon around it and tying it in a simple square knot.
-You could also use colored card stock for the lid (stamped or rolled in a coordinating color ink) and white for the bottom.
These boxes are way easy and just too cute.
Happy Stampin'!